
In this video, you heard from Uta Wehn from the GroundTruth 2.0 project, who explained their Citizens Observatory’s approach to discovering and mapping a problem.
She talked about the co-design approach that GroundTruth 2.0 uses. Their collaborative process ensures that no single stakeholder pre-defines the problem without discussion. The goal is to analyse, define and agree on key issues together. By working this way, citizens, scientists, policymakers and other stakeholders can commit to the project, knowing that it fits their own needs and interests.
There are many different ways to build a co-design approach at the start of your project. As Uta describes in this video, you can hold face-to-face meetings where everyone comes together to discuss the issue. These meetings provide a space for people to express their concerns and listen to the concerns of others.
There are ways that you can facilitate these discussions and contributions online too. One way to do this is to use an online mapping tool, such as Zeemaps, where everyone can contribute to a concentrated discussion on an issue.
There are many reasons why you might also use geographical mapping to help you understand an issue. If you are considering mapping in the early stages of your project, you could map the hotspots of the environmental problem you want to tackle. You may also want to cross-reference those hotspots with other helpful information, for example, the proximity to community hubs, schools, and hospitals.
The key to geographic mapping is to make it a hands-on activity, with everyone using a shared map to discuss and detail the issues they face. It is a way that people can collaborate, just as the GroundTruth 2.0’s co-design approach described in the video.
In this video, you heard from Professor Mel Woods, who shared some of the collaborative activities that the citizen observatories part of the WeObserve project have been involved in.
Community-based environmental monitoring is when groups of people or communities collect information to create new knowledge. These people can be in the same geographic location or spread all over the world. In many cases, these activities use personal devices or sensors, like apps on a mobile phone, to help people collect and upload the data online.
There is also often a collaborative feature to the online platforms. For example, they might use chat forums so that people can discuss the data they are collecting, how they are doing it, and what they are discovering from their activities.
Some projects encourage people to get together. For example, if a community in the same geographic area is collecting information on an environmental issue experienced locally, they can have weekly “meet-ups” where they discuss the challenges they face or share exciting insights or news.
In the video, you heard about:
These are a few ways that communities can form in a citizen science project.
Why is it helpful?
It can be difficult to understand other people’s concerns. For example, air quality is a big issue for people living with an illness such as asthma, who need to manage their condition by minimising their exposure to polluted air. Noise pollution can cause distress for families with young children and shift workers, and it can cause late-night problems in tourist areas of a city.
Doing an Empathy Timeline activity can help us better understand the issue at hand. It also helps us to look at both sides of a problem and our role in it.
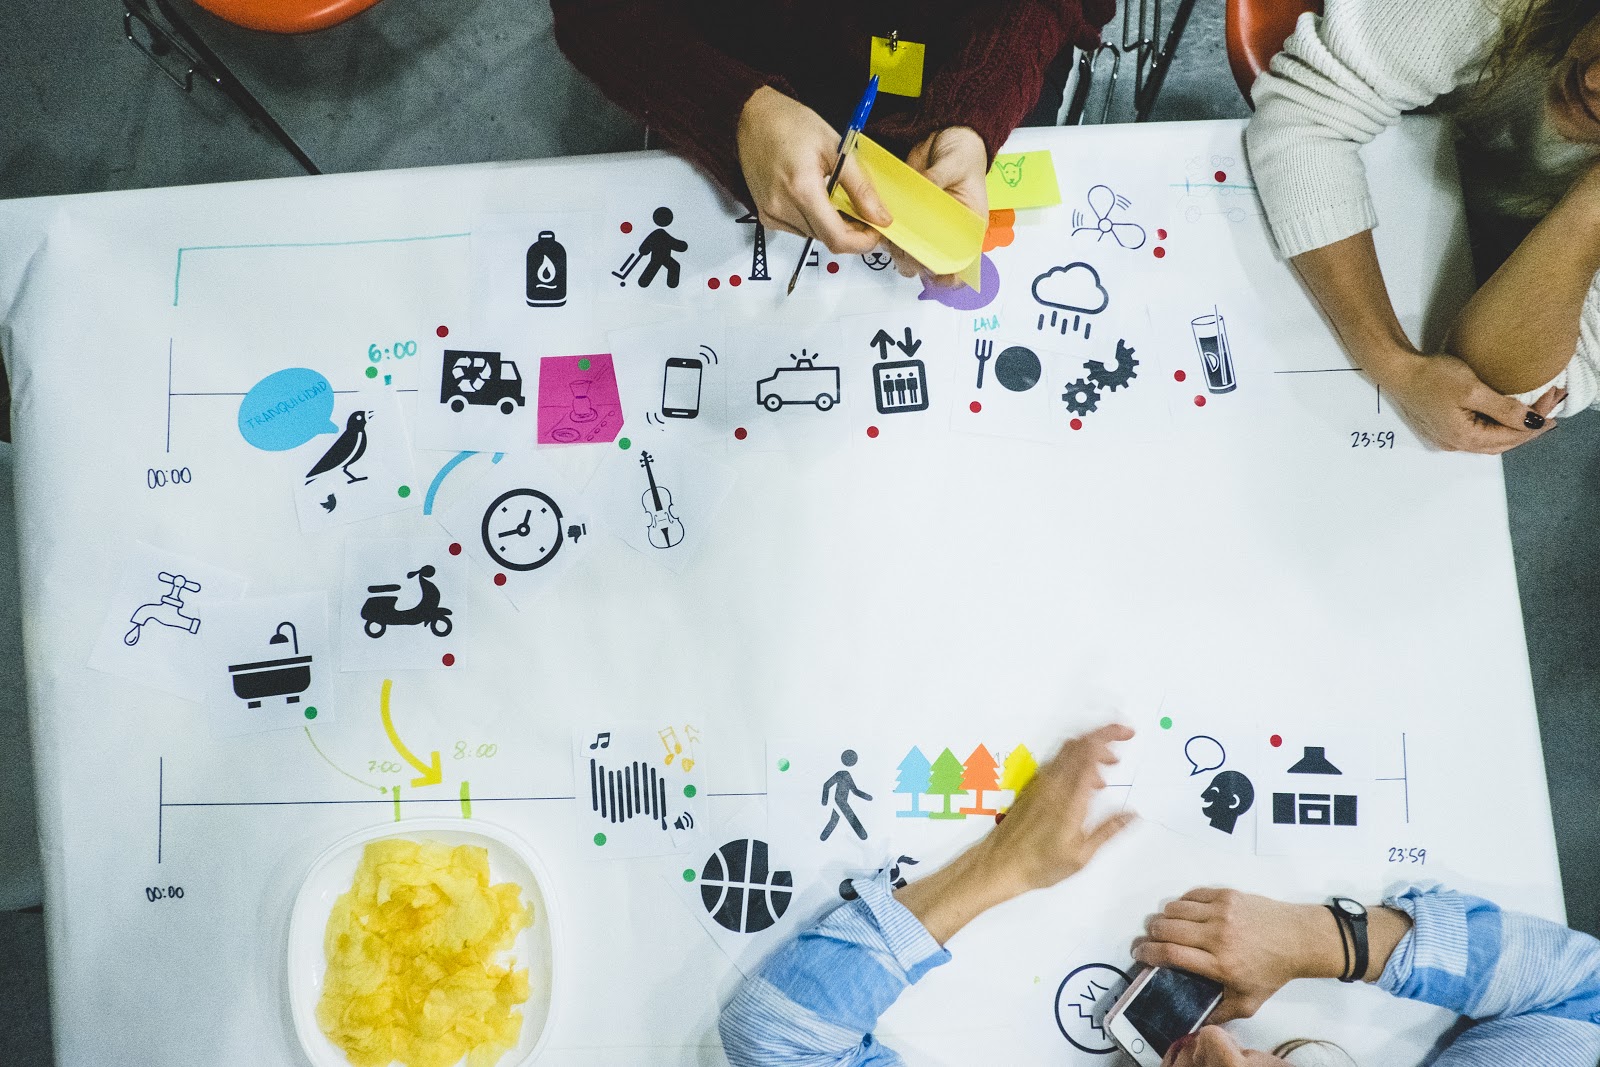
Description
This method helps to unpack an environmental issue. We all can become fixed in our own personal viewpoints; this approach allows people to think about (and sometimes challenge) their own perceptions. The empathy timeline supports people in talking about the ways that they are affected by a shared issue e.g. noise levels in a street, but also the ways that they contribute to solving it. This approach facilitates community building by bringing people together to discuss shared problems, and consider them in a way that they maybe haven’t done before.
Key Question
How were you affected by the problem, and how did you contribute to it?
Time needed
30 minutes
Who should be included?
Facilitators and community members
Number of people required
1 - ∞ (2-20 people max recommended if it is the facilitator/community runs the session for the first time). Participants will be divided into groups of 3-6 people.
Resources needed
A1 sheet of paper (or canvas provided), markers, shapes, and icon cut-outs (sample shapes provided), sticker dots, scissors, glue.
How to prepare?
Find a space with a few tables and chairs where people affected or interested by the same issue can sit comfortably for at least an hour. Having enough room to be able to give each group a bit of space is important too.
Print the timeline worksheet, you can find it in the additional materials section at the end of this article. Or, if using an A1 sheet of paper, draw two parallel lines horizontally across each sheet. At the ends of both lines, mark out a unit of time, e.g. 24-hour day or a year.
Cut out different icons or images related to the issue at hand. Include some abstract shapes too, adding anything that might spark creative thought. We have provided a link to some examples at the bottom of this step.
Steps:
Split into small groups (no more than 6 people in each) and fill in the timelines using the materials provided.
Ask everyone to focus on the top line first, which represents the ways that you have been affected by the shared problem in the timeline decided. Ask everyone to consider what they encountered throughout the day in relation to the issue, specifying that they include positive things as well as negatives. Use the markers, shapes and icon cut-outs for this.
Switch to the second timeline, asking everyone to repeat the process to represent how their own actions might have contributed to the issue in that timeline, and map out when and what they have done. Use the markers, shapes and icon cut-outs for this.
Once the groups have populated the timeline with all their activities, ask all the participants to use green and red sticker dots to identify which things they consider to be positive, and which negative.
Ask each group to share with each other, maybe having them self-select a representative to make a quick presentation, paying particular attention to the discussions and insights.
Document the activity by photographing the completed worksheets, they can be great reference points to come back to during and at the end of your project activities.